VISUAL TECHNOLOGY PRODUCTION ( MPT 1483)
(10th March 2014)
Salam...
Bismillah...
Yeah!!!now is week 5 already.....
This week lectured by En. Fuaat as tutor to explain more about DSLR, COMPOSITION AND BASIC SHOOTING and our nicely lecturer Prof. Dr Jamalludin added some information.
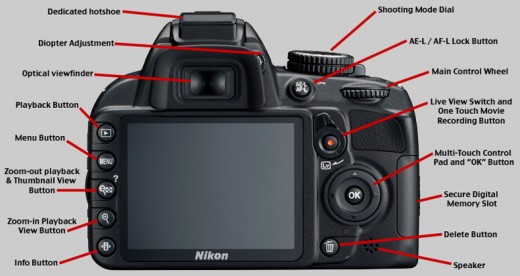
PART OF DSLR
(10th March 2014)
Salam...
Bismillah...
Yeah!!!now is week 5 already.....
This week lectured by En. Fuaat as tutor to explain more about DSLR, COMPOSITION AND BASIC SHOOTING and our nicely lecturer Prof. Dr Jamalludin added some information.
PART OF DSLR
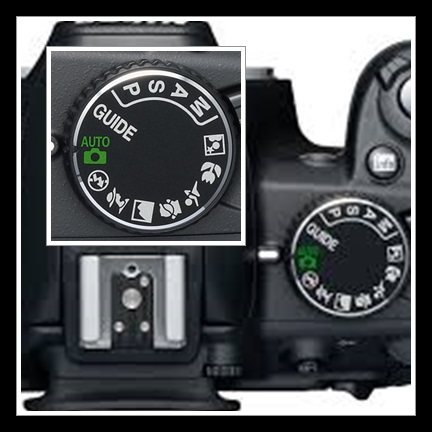
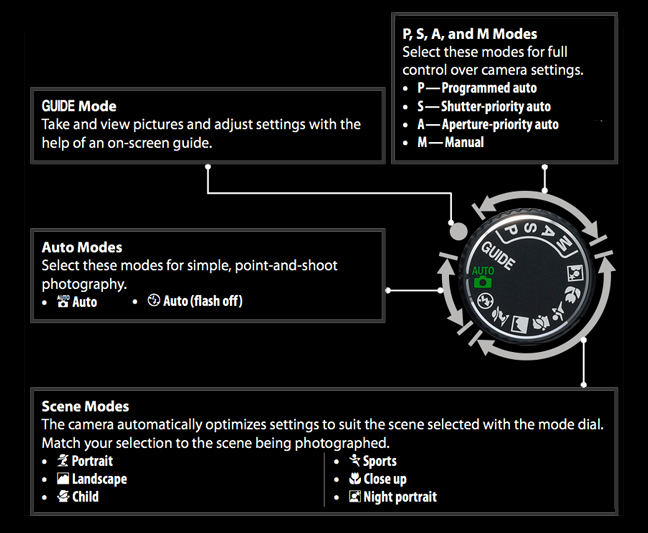
MODE'S DIAL
BASIC COMPOSITION (METERING)
Nikon DSLRs and some Coolpix Cameras you will have three metering methods to choose from. Each method estimates the exposure of the scene by calculating light in different ways.
Nikon DSLRs and some Coolpix Cameras you will have three metering methods to choose from. Each method estimates the exposure of the scene by calculating light in different ways.
- Spot
- Center-Weighted
- Matrix

Spot: Metering measurements are made from a spot about the size of the center focusing bracket seen on the ground glass. Regardless of which focusing area is chosen the highlighted focus area becomes the active spot for calculating exposure. Everything inside the spot is averaged for exposure determination. Bright or dark areas within the spot will give extreme readings. It is recommended to use a middle-toned subject to capture the scene at a desired exposure. Meaning, lock the exposure when half-pressing the shutter release button while the middle-value tone is in the active focus area, then allow autofocus to occur at the moment the shutter release button is fully pressed.When to use it? Using the Spot Meter takes practice and learning which areas of the frame make good exposure targets is something the camera will teach to you over time. Use the histogram feature in the Playback mode of your Nikon Camera to evaluate how well you are doing.
- 5 Spot meters in D100, D1X, D1H, N80, F100 and F5
- 11 Spot meters in D2X, D2H, D200 and F6

Center-Weighted Meter (Variable): this method gives weight to the overall exposure calculation. Meaning the circular area in the middle of the frame averages everything it finds there, giving that calculation a 75% weight in the overall computation for exposure. Brightnesses outside the circle are still considered however their influence is minor. The size of the circular reading can be changed depending on which Nikon Camera you have.

Matrix Meter is called the 3D RGB Color Matrix Meter.
This meter gathers information from 1005 red, green, and blue sensors and factors in distance information provided by the lens as it evaluates proper exposure calculation. This meter instantly analyzes a scene’s overall brightness, contrast, and other lighting characteristics, comparing what is sees against an onboard database of over 30,000 images for unsurpassed exposure accuracy, even in the most challenging photographic situations. By the time the 3D Matrix meter has made its considerations of colors by hue and saturation, tonal ranges by brightest and darkest, areas of similar tonality that are connected or separated, distance to the subject, and compared that to its database generated from photographic images, it’s got a very good idea of what the exposure should be.
If you are a beginner, Matrix is where you should start. As your skills grow, and they will, you will acquire a better understand of when it might be beneficial to use other light metering options.
What is the database of over 30,000 images?
Over the years Nikon has studied the color, area of coverage, focus distance, contrast, size and shape of shadows and highlights and exposure characteristics of over 30,000 actual photographic images and incorporated this data as a reference source for the expert exposure system that is the 3D Color Matrix Meter.
AUTOFOCUS AREA MODE/
http://imaging.nikon.com/history/basics/16/02.htm
AF-Area Mode (Viewfinder Photography)The area of the frame that the camera will use for autofocus is shown by focus points in the viewfinder. Photographers can choose where the camera will focus by choosing a focus point. The selection can be made by the photographer or left up to the camera. The setting that determines how the focus point is selected is called AF-area mode. You can choose from auto-area AF, single-point AF, dynamic-area AF, and 3D-tracking. These AF-area modes are described below.
Single point
The photographer selects the focus point manually; the camera focuses on the subject in the selected focus point. Choose for stationary subjects.
Dynamic area
The photographer selects the focus point manually as above, but if the subject briefly leaves the selected focus point, the camera will focus based on information on the subject from surrounding focus points. Choose for subjects that are moving unpredictably.
Auto area
The camera detects the focus point containing the subject and focuses automatically.
3D tracking(11 focus points)
The photographer selects the focus point manually; if the shutter-release button is kept pressed halfway after the camera has focused, the photographer can change the composition and the camera will automatically choose a new focus point as necessary to maintain focus on the selected subject.
HISTOGRAM
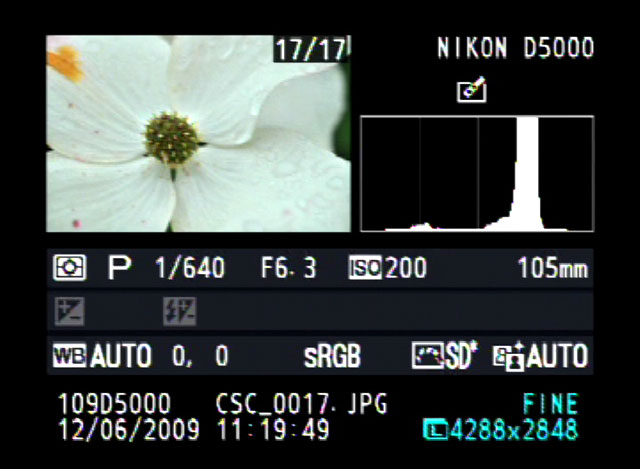
The histogram is a graphic representation of the tonal range in a photograph, and its analysis of the image's tonal range provides a precise check on exposure. The histogram depicts the range of tones in an image from the darkest on the left of the graph (0 in digital terms) to the lightest on the right side (255 in digital terms).
You might think of it this way: a light meter reads the scene before you take the photo; the histogram analyzes the photo you've just taken. You can choose to have the histogram appear on the camera's LCD along with the playback display of your photo (see your Nikon D-SLR manual for the exact procedure).
That's what the histogram is. But why is it an important, fundamental tool of digital photography? Simply because your understanding of the histogram will tell you if it's necessary to adjust your exposure, and it will indicate how to make that adjustment.
The first thing to realize, though, is that it's not always necessary to use the histogram. In fact, selective use is best. Few if any photographers look at the histogram for each and every photo they take. In the majority of instances, your camera's meter will accurately and precisely set the correct exposure for the scene.
But you should check the histogram when a scene's lighting is especially tricky; when there are areas of deep shadow and bright light in the same scene; and when you're going to take a series of images in the same setting and want to be sure your exposure is right on target.
A glance at the histogram will tell you if parts of your photo are over- or underexposed. Overexposure means lack of detail in the highlights; underexposure, loss of detail in the shadows. The histogram will instantly reveal the situation: a heavy concentration at the left side of the graph means the image is underexposed and you've lost detail in the shadow areas; a heavy concentration at the right means your highlights may be blown out. The remedy? You can increase your shutter speed, close down aperture or lower your ISO to correct overexposure; the opposite settings will serve to correct an underexposure.
Here's something you might want to use in connection with the histogram: the highlight overexposure warning. Set this option (again, see your manual for the specific activation method) and areas of overexposure will blink in the playback image. When you see these flashes of light—most people call them "blinkies"—you'll know exactly which areas of the image are overexposed.
Several Nikon D-SLRs feature secondary, color histograms. Choose to display them and you'll see three small graphs that show the intensity of the RGB (red, green and blue) color values in the scene. If you need to adjust these values, the camera's white balance control is the way to do it.
Some Nikon D-SLRs also allow you to magnify specific areas of the photo on playback so you can check exposure and detail rendering in very specific parts of the image. In effect, you're directing the histogram's area of analysis.
The accompanying images provide examples of what we've been talking about, but the best way to see exactly how the histogram can help you take control of your photography is experimentation and experience. Just go out and take pictures in a number of situations and become familiar with what the histogram can tell you about the results.
HOW TO HOLD YOUR DSLR
This sounds a bit silly, doesn't it? How to hold your D-SLR camera? It's pretty obvious: You pick it up with the lens pointing away from you, put your eye to the viewfinder and press the shutter button. Couldn't be simpler, right? Well, yes and no. Doing the above will certainly get a picture, but the way you hold your camera can help ensure you get a good picture.
What one thing ruins more pictures than anything else? The blur that results from an out-of-focus image. Holding the camera correctly can help prevent that blur.
Blur is caused by the movement of either the subject or the camera. Subject movement is something we really can't control, although adjusting the shutter speed can give us some control over how subject movement is captured. Camera movement, however, is something we can control. Short of using a tripod or a VR, image-stabilized NIKKOR lens, holding the camera properly is the best way to avoid a blurry picture.
You need to hold the camera as steady as possible. Hold the camera's handgrip in your right hand and cradle the camera body or lens with your left. Keep your elbows propped lightly against your torso for support and place one foot half a pace ahead of the other to keep your upper body stable. This is a steadier position than holding the camera away from your face.
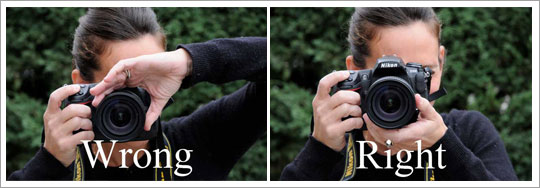
Use your left hand to cradle the lens, so that it's helping to support the weight of the camera. The added weight of a digital SLR can also help to steady the camera. Wrapping your left hand over the top of the lens makes it less stable and more likely that you'll move the camera while shooting. When you're ready to take the picture, press the shutter release button halfway to focus. When focus is complete, the selected focus point or points will be briefly highlighted. Smoothly press the shutter release button the rest of the way down to release the shutter and record a photograph. Try these suggestions and you may see less blur and more sharp, in-focus pictures.

Why does it matter how I hold my DSLR?
Grab a flashlight or a laser light and shine it on the wall across the room. No matter how hard you try, it is impossible to hold the light perfectly still. That’s actually an accurate description of sharpness in photography. Your camera is attempting to record light from an area away from the camera, yet the camera is moving. Learning to hold your camera properly will hugely impact how slow of a shutter speed you can achieve while hand-holding.
It’s ironic to me that many photographers are willing to spend thousands of dollars on fast lenses or new cameras with better low-light performance, yet they don’t spend 10 minutes to think of the steadiest ways to hold the camera.
REFERENCES:
http://www.nikonusa.com/en/Learn-And-Explore/Article/g699vchg/getting-started-how-to-hold-your-d-slr-camera.html#!
https://improvephotography.com/1365/how-to-properly-hold-a-dslr-camera/
https://support.nikonusa.com/app/answers/detail/a_id/13774/~/what-is-the-difference-between-spot,-center-weighted-and-matrix-metering%3F
http://imaging.nikon.com/history/basics/16/02.htm
 RSS Feed